
Zemk.mk – Блог

Posts in the Инфо category

The DNS zone is the place where all DNS records for your domain are stored. It determines where the domain points, where email will work, and how other services will be connected to it.

At Zemi.mk, the way you edit the DNS zone depends on where the domain’s nameservers are pointed.

If you only have a domain and do not use a hosting package, with the correct nameservers set, you can edit the DNS records through your user profile. If the domain’s nameservers are pointed to the hosting package you use, then DNS changes are made through cPanel.

This guide will help you easily identify which method is right for you and how to make the change step by step.

When are DNS records edited through the user profile?

Editing through the user profile is suitable when you have a domain and want to manage the DNS zone directly from the Zemi.mk user panel.

This is especially useful when the domain owner does not use a hosting package, or when the user has other external services for creating a website, such as Shopify, Lovable, and similar platforms.

In that case, if the nameservers shown in the DNS zone panel are set, namely n30.zemi.mk and n31.zemi.mk, you can activate the DNS zone and then edit the DNS records directly through your user profile.

When are DNS records edited through cPanel?

If the domain uses the same nameservers that point to your hosting package, then the DNS zone is usually edited through cPanel.

This means that the domain is connected to the hosting environment, so DNS record management is done from the hosting panel itself. This is where you will most often edit records such as A, CNAME, MX, or TXT, especially if the domain already has an active website or email service on the same hosting.

Put simply, if you manage DNS for a standalone domain, you work through the user profile. If the domain is connected to a hosting package and uses nameservers that point to that hosting, you work through cPanel.

How to edit the DNS zone through your Zemi.mk user profile

The process is simple and is done directly from your user profile.

First, log in to your Zemi.mk profile. After the dashboard loads, select Domains from the left menu. There, you will see all domains available on your profile.

From the list, click Details for the domain you want to edit. This will open the page with information about the selected domain, where you will see the basic details, nameservers, and other available management options.

Then select Edit DNS Zone.

If the DNS zone has not yet been activated, the system will show you a message explaining that, in order to use the DNS zone, you need to set the appropriate nameservers. In this section, you will also see which nameservers should be used, namely n30.zemi.mk and n31.zemi.mk.

You can change the nameservers for the domain from the domain management menu, that is, in the domain details, in the Nameservers section, by selecting Edit.


Once you are on this page, click Activate DNS.

It is very important to pay attention to the following:
once activation begins, you need to wait for the process to complete fully. Do not refresh the page and do not close it while activation is in progress.

After successful activation, the DNS zone will become available for editing, and you will be able to view and modify the existing DNS records.

The table will display the records for the domain, and next to each record you will have an option to edit it. When you click edit, a form opens where you will usually see the following fields:

Name — the name of the record, meaning the domain or subdomain the record refers to
TTL — the record refresh time
Type — the type of DNS record
Address / Data — the value you want to enter

After making the necessary change, save the changes.

This way, you can edit different DNS records depending on what you want to achieve. For example, if you want the domain to point to a specific IP address, you will usually edit an A record. If you want a subdomain to point to another domain, you will usually use a CNAME. If you are setting up email or verification for a service, you may need to add an MX or TXT record.

How to edit the DNS zone through cPanel

If the domain uses the same nameservers as your hosting package, then DNS records are edited through cPanel.

To begin, log in to cPanel for your hosting package. In cPanel, look for the DNS management tool marked as Zone Editor.
After opening the tool, you will see a list of domains connected to your hosting package. Select the domain for which you want to make changes.

You can then add a new record or edit an existing one. Depending on your needs, you will choose the record type, enter the name, value, and any other required fields, then save the changes.

Always first check whether the domain really uses the same nameservers as the hosting package. This is the most important step, because it determines whether the change should be made in the user profile or in cPanel.

What is important to know before making a DNS change

DNS changes do not always apply immediately. Although sometimes a change can become visible quickly, in certain cases it may take more time for the update to fully propagate.

The reason is that DNS records are cached and refreshed according to the TTL value, as well as according to the networks and providers through which the lookup is performed. That is why it is normal for the change to appear sooner for some users and later for others.

For this reason, after making a change, it is good to wait for a certain period before concluding that something is not working. This is especially important if you are changing records related to a website, email, or verification services.

How to know which method is right for you

If you only have a domain and want to manage the DNS zone directly from your profile, activate the DNS zone in the user profile and use the listed nameservers.

If the domain is already connected to a hosting package and uses the same nameservers as the hosting, then edit the DNS records through cPanel.

Once you understand this, the whole process becomes much simpler and you avoid making changes in the wrong place.

Changing a DNS zone does not have to be complicated if you know in advance where the change needs to be made.

If you are not sure which DNS record you need to enter or exactly where the change should be made, contact Zemi.mk support for guidance before proceeding.
At Zemi.mk, every hosting package is already technically optimized for WordPress, runs on a LiteSpeed web server, and includes a free SSL certificate. For Macedonian businesses, the free .mk domain you receive with our hosting packages is a strong signal of local relevance and can help achieve better rankings on Google Macedonia.

This guide explains how to apply all SEO checks in WordPress yourself, but also why each point matters, so you do not optimize “blindly”, but with understanding.

1. Image optimization — how and why

Why should images be named descriptively before upload?

Google and other search engines do not “see” images like people do. They understand them through:

  1. The file name

  2. ALT text

  3. The context around the image — title, paragraph, page topic

  4. Metadata and loading speed

When an image is named like this:

black-friday-wordpress-hosting.mk.jpg litespeed-wordpress-fast-server-macedonia.png

It tells Google:

  • what the image is about

  • which topic it belongs to

  • whether it is relevant for searches around a specific keyword

Detailed explanation of the SEO value:

1. Better indexing in Google Images

Descriptive names allow images to appear when users search for related terms. This brings additional organic traffic.

2. Clear topical signal — Relevance Boost

If the page is about “WordPress hosting” and contains an image named “wordpress-hosting.jpg”, the search engine receives a consistent signal, which strengthens ranking.

3. Better accessibility — Accessibility = indirect SEO factor

Screen readers and Google algorithms use ALT text, which is often automatically filled based on the filename if the user does not enter ALT text manually. If the filename is good, the ALT starting point is already strong.

4. Safer than over-optimization

Images should be named descriptively, but not spammed. The hyphenated format is the cleanest and does not confuse the algorithm:

✔ good: web-hosting-macedonia.jpg
✖ bad: webhostingmacedonia123!!!.jpg

5. Format suitable for web performance

A name without special characters reduces the chance of server and CDN errors, which is important for stability and crawling.

How to properly optimize images in WordPress?

Step 1: Naming before upload

  • Use Latin characters

  • No spaces; use - instead

  • Make it descriptive and related to the topic

  • Include the keyword naturally

Example template:

topic-keyword-description.jpg

Step 2: Upload to Media Library

  1. Dashboard → Media → Add New

  2. Drag the image or select it from your computer

  3. Wait until it is fully uploaded

Step 3: Filling in ALT text

  1. Click the image in Media Library

  2. On the right → Alternative Text (ALT)

  3. Enter a description that:

    • contains the keyword if relevant

    • explains what is shown

    • is not too long — up to 125 characters is ideal

Example:

WordPress hosting optimized on a LiteSpeed server in Macedonia

Step 4: Compression and next-gen formats

In a Zemi.mk LiteSpeed environment, the best option is:

  1. LiteSpeed Cache → Media → Image Optimization

  2. Enable:

    • Generate WebP Versions → ON

    • Lazy Load Images → ON

  3. Click Optimize Images

Or, if you do not use the LSC plugin for optimization, install an image optimizer such as ShortPixel, Imagify, or Optimole.

Step 5: Check whether WebP images are loading

  1. Open the website

  2. Right-click an image → Open image in new tab

  3. If the URL ends with .webp → optimization is working

2. URL optimization — explanation and implementation

Why should URLs be clean and include keywords?

The URL is one of the first SEO signals Google reads. It should be:

  • short

  • clear

  • descriptive

  • include the main keyword

Example:

https://zemi.mk/wordpress-hosting-macedonia

This is important because:

  1. CTR increases
    Users are more likely to click a URL they understand.

  2. Topical relevance
    A keyword in the URL is a strong ranking signal.

  3. Site architecture
    Categories and subpages in a logical order help Google understand what is important.

How to set permalinks in WordPress?

  1. Dashboard → Settings → Permalinks

  2. Choose:

    Post name
  3. Save Changes

How to change the URL of a post/page?

When creating a post or page:

  1. Dashboard → Posts or Pages → Add New

  2. Near the title, you will see:

    Permalink: https://yourdomain.mk/?p=123
  3. Click Edit

  4. Enter the URL slug:

    keyword-description

    Example:

    wordpress-hosting-macedonia
  5. Save

3. Speed and hosting — is it true that they affect ranking?

Yes. Speed is an SEO factor because:

  • it affects Core Web Vitals

  • it affects User Experience Signals

  • faster crawling → more pages indexed → better ranking potential

The LiteSpeed server we use at Zemi.mk:

  • serves static files faster

  • has more efficient cache than Apache/Nginx in a WordPress environment

  • reduces TTFB — time to first byte

  • improves real-world WordPress performance

4. Additional critical checks in WordPress

Connecting Google Search Console

  1. Go to the plugin:

    • Rank Math → General Settings → Search Console → Connect
      or

    • Yoast → Site Features → Webmaster Tools

  2. Connect your Google account

  3. Verify domain ownership if required

XML Sitemap

Open:
sitemap_index.xml → submit it in Search Console → as explained above

Robots.txt check

Open in your browser:
https://your-domain.mk/robots.txt
Make sure it does not contain:

Disallow: /

Mobile-friendly check

Google mobile test → enter your domain → fix responsive issues if they are reported

Caching purge

LiteSpeed Cache → Toolbox → Purge All Cache

Database optimization

LiteSpeed Cache → Database → Optimize All

Broken link scan

  1. Plugins → Install: Broken Link Checker

  2. Scan and fix links that return 404 errors

Schema Markup

Rank Math automatically adds schema, but check:
Rank Math → Titles & Meta → Schema Types
Choose the type according to the website — Article, Product, Service, LocalBusiness, etc.

5. Local SEO and .mk domain — why is it important?

The .mk domain is important because:

  1. Geo-target signal
    Google understands that the website is intended for Macedonia.

  2. Local trust
    Users have greater trust in a local domain.

  3. Faster local ranking
    For businesses targeting the Macedonian market, .mk is a competitive advantage.

  4. Lower risk from keyword competition
    With a .com domain, you may rank globally, but locally, .mk often wins for Macedonia.

At Zemi.mk, you get the .mk domain for free with a hosting package, so you can start with an SEO advantage from the very beginning.

If you follow these checks, you will have a WordPress website that is:

  • technically stable

  • fast for users and Google bots

  • secure — HTTPS + SSL

  • locally relevant — .mk domain

  • with optimized images and clean URLs

Zemi.mk is upgrading its standard shared hosting packages with new TURBO variants, created for users who need significantly more resources, stability, and speed. With this expansion, the three most commonly used packages — Solo, Business, and Premium — become even more powerful, without losing their simplicity and affordability.

What do the TURBO packages include?

The Turbo versions of the packages include significantly higher limits and performance:

  • 4 CPU cores — 400% compute power

  • 5 GB RAM

  • 200 simultaneous processes

  • 4095 IOPS

  • 200 MB/s disk throughput — I/O

  • Optimized LVE profile

  • Significantly faster loading and improved stability

This makes the Turbo packages an excellent choice for growing web projects, online stores, WordPress websites with many plugins, news portals, and all users who want VPS-like speed while remaining in a shared hosting environment.

Free .mk domain included with all packages

Every hosting package, including the Turbo versions, includes a free .mk domain for the first year.
Registration: https://zemi.mk/domains/search

As a licensed MARnet registrar, Zemi.mk provides fast and simple registration, without additional procedures, in full compliance with the new MARnet Rulebook, as well as the Law on Electronic Documents, Electronic Identification and Trust Services.

Why are we introducing the TURBO packages?

The goal is to give users more freedom and more power without migrating to more expensive platforms. Many Macedonian businesses experience seasonal or campaign-based traffic peaks. Turbo resources provide stability precisely in those moments.

The higher limits provide:

  • faster website loading

  • better use of caching

  • more active visitors in parallel

  • better performance for WooCommerce and CRM applications

  • minimized chances of “Resource Limit Reached” issues

Availability

The new Turbo packages are available here:
https://zemi.mk/hosting

On the occasion of its 10th anniversary, Zemi.mk is celebrating with a special promotion: 50% off all shared Linux hosting packages, with free .mk domain registration included.

The promotion is valid until 31.08.2025 — make sure to use it in time!

Why take advantage of this anniversary offer?

High performance and stability:
Our cloud infrastructure provides fast and reliable hosting, with minimal downtime and maximum functionality.

Advanced features:
PHP versions of your choice, unlimited databases, FTP, automatic backups, email hosting, and much more — everything you need for a successful website.

Support in Macedonian, 24/7:
Our team is here to help you quickly, professionally, and without delay, whenever you need us.


How to activate the promotion?

Visit our website, choose your hosting package, and follow the instructions during checkout. The discount will be calculated automatically, and the .mk domain will be included at no additional cost.


Terms of use for the “10 Years of Zemi.mk” promotion:

– The promotion is valid from 04.08.2025 until 31.08.2025 at 23:59.
– The offer is valid only for new users and is available exclusively for domains that have not previously been hosted with Zemi.mk.
– Packages will be activated after eligibility verification by our team.
– If misuse is detected, for example existing users purchasing again under a different name, the package will be suspended and the funds refunded.
– The same rules apply to the subsequent addition of domains that have already been hosted — such a package will be suspended without the right to a refund.


Don’t miss it — this is not just a discount, it is 10 years of trust turned into an offer.


Additionally optimize your WordPress website with Redis caching.

Before you start activating Redis caching, go to the Select PHP Version tool in cPanel and make sure the Redis and Memcached extensions are enabled.

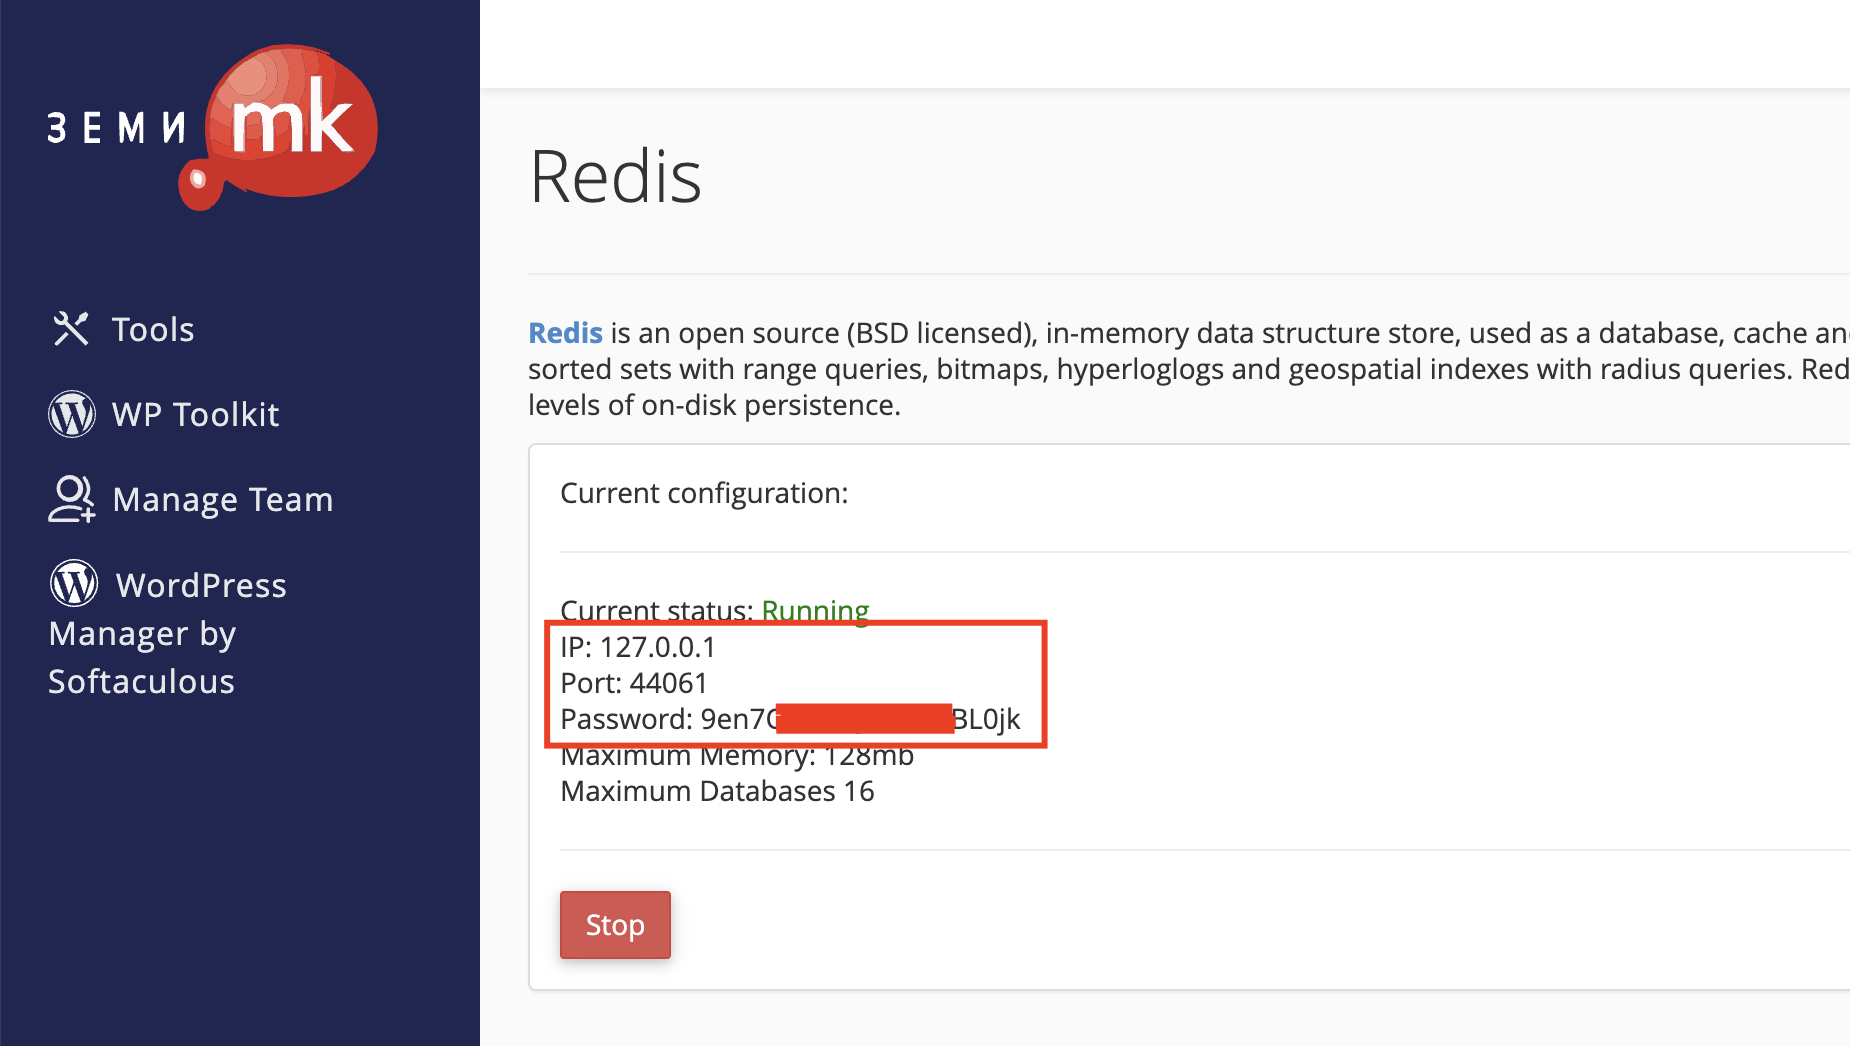
To begin, log in to cPanel, open the Redis tool, and click “Start”. Once started, a port and password will be generated for you.

redis-zemi-mk

After you receive these details, open your WordPress dashboard and, if you have not already done so, install the LiteSpeed Cache plugin. ([https://wordpress.org/plugins/litespeed-cache/](https://wordpress.org/plugins/litespeed-cache/))

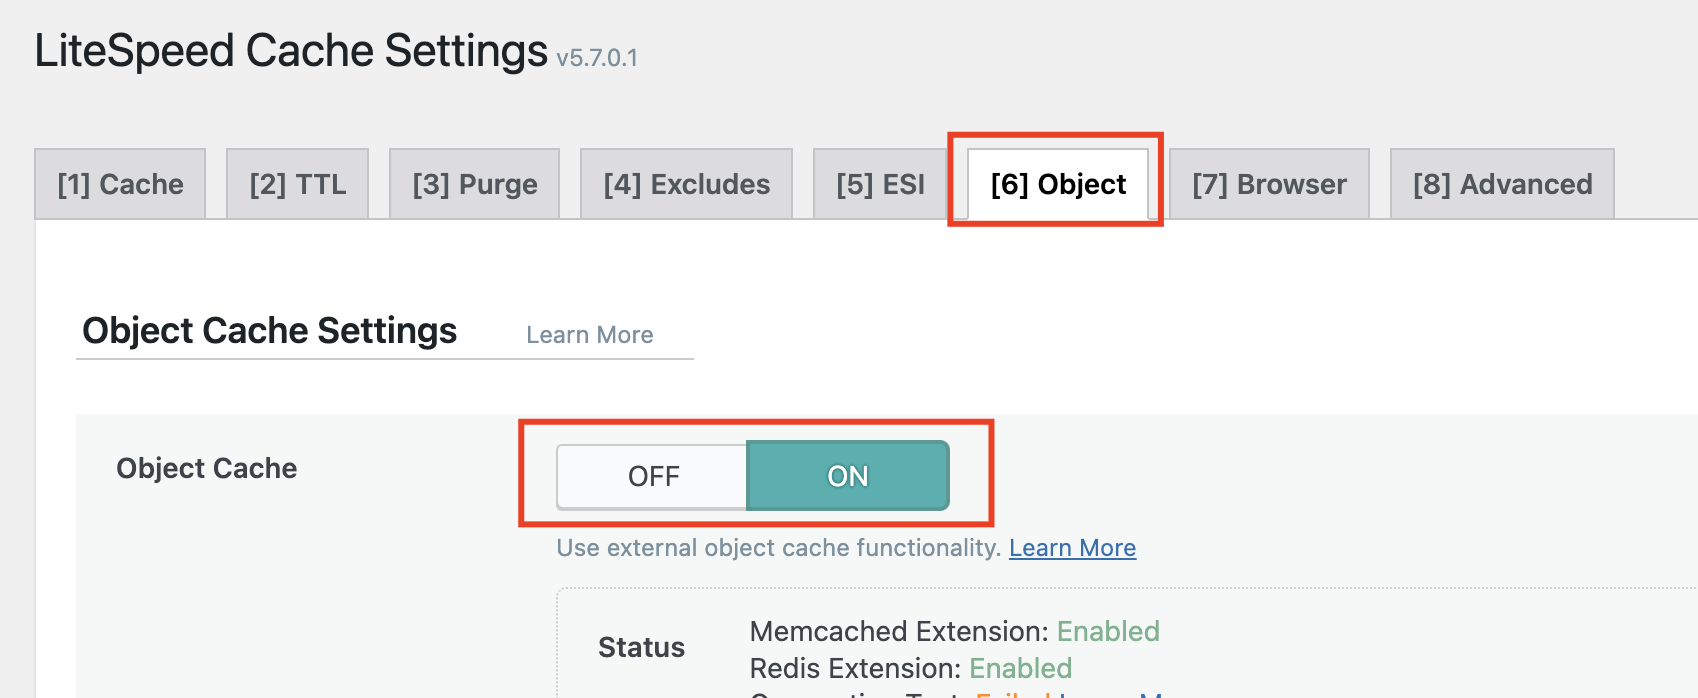
After installing the LiteSpeed Cache plugin, open its settings, go to the Object tab, and click ON to enable it.

litespeec-cache-redis-zemi-mk

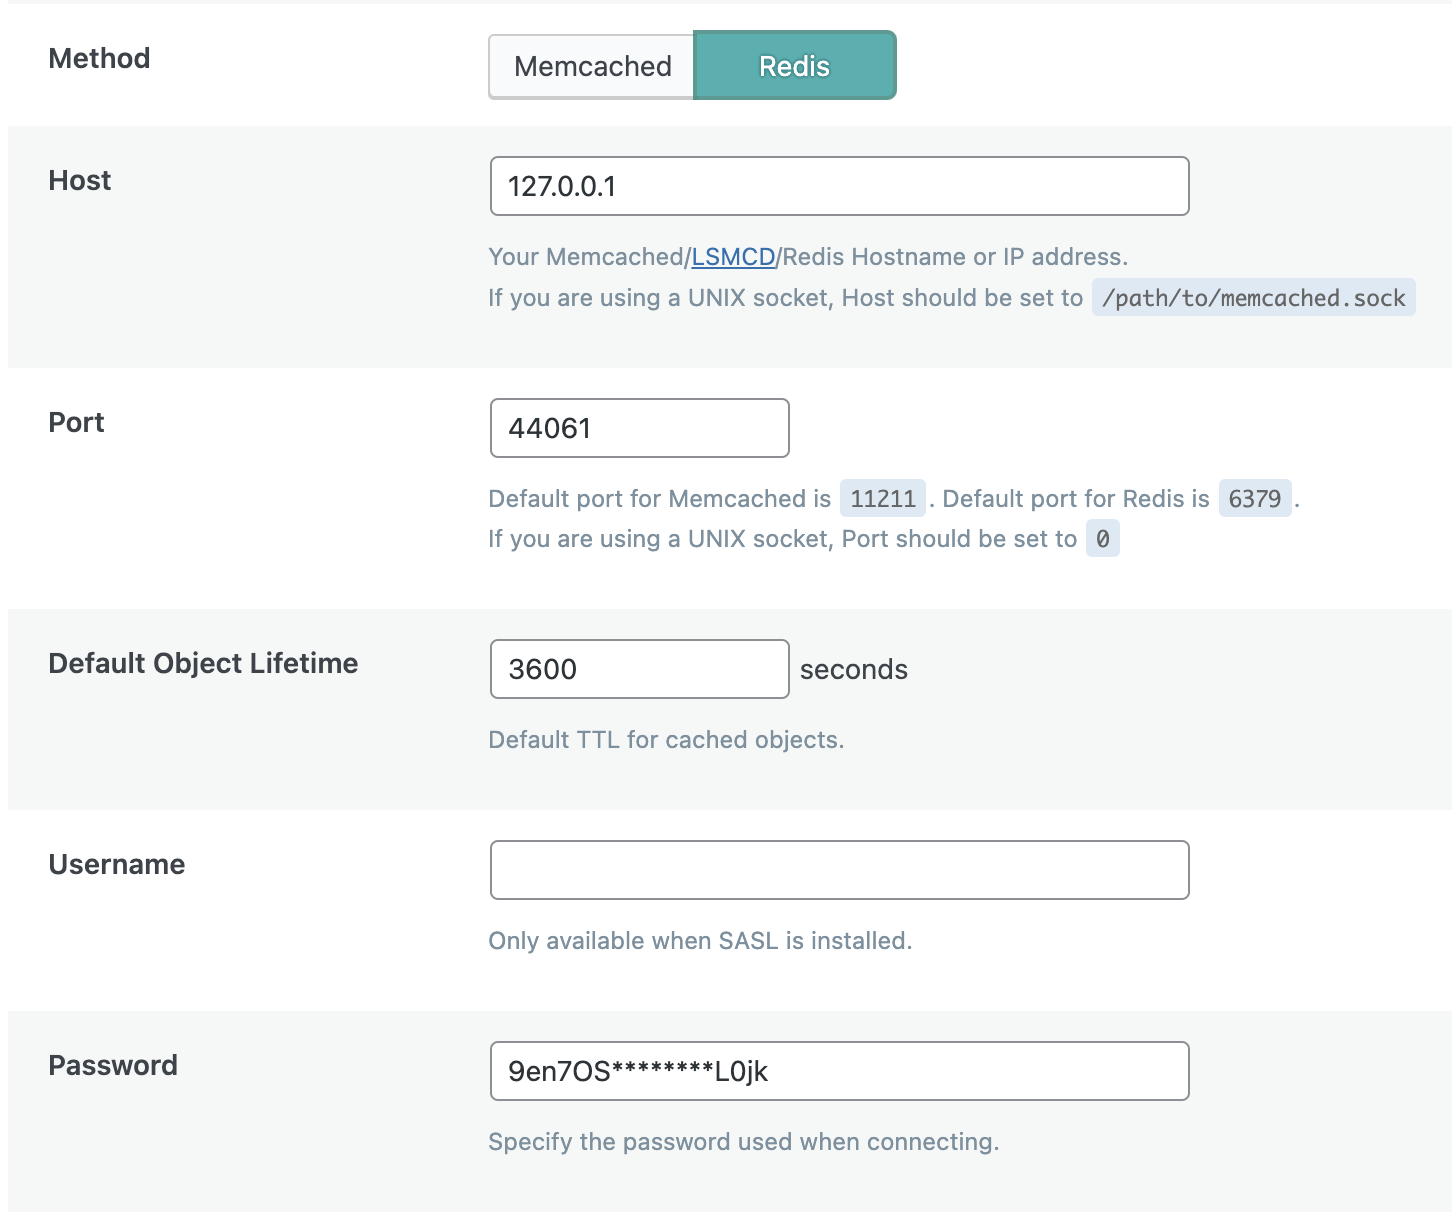
In the settings, choose Memcached or Redis — in our case, Redis — and enter the details you received earlier. Leave the Username field empty and click “Save changes”.

redis-za-wordpress-lscache-zemi-mk

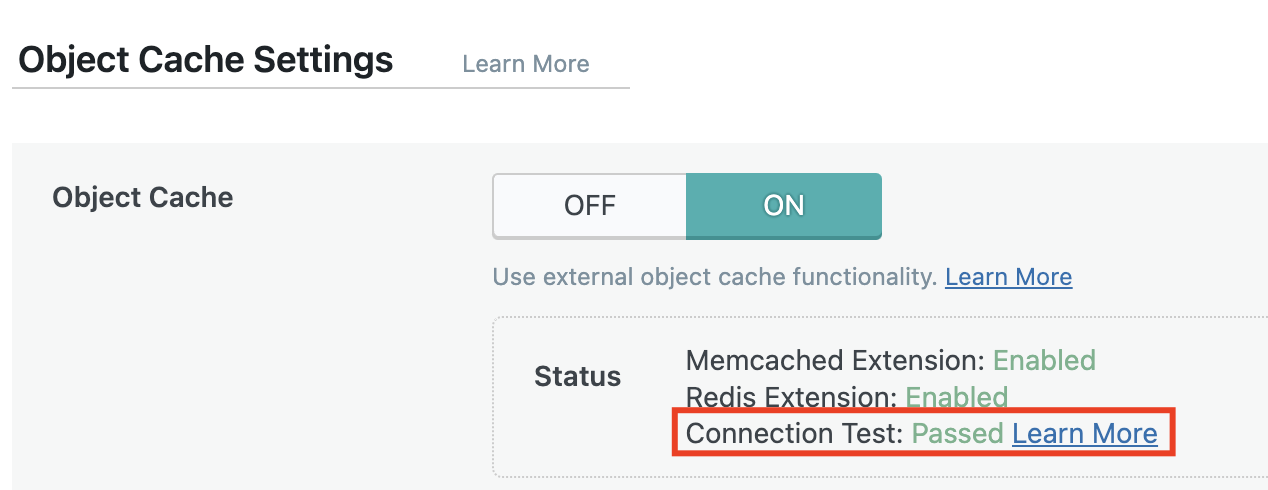
If the setup is successful, the “Connection test” section will show “Passed”.

connection-test-redis-zemi-mk

Optimizing a WordPress website requires technical knowledge. However, below are several additional simple tips you can follow even without your web developer.

Once you have configured Redis or Memcached caching, proceed with removing unnecessary plugins. A large number of plugins can significantly slow down the loading of any WordPress website. Plugins such as UsageDD and Plugins Garbage Collector can help you identify problematic plugins and processes.

Enable CloudFlare for your website. You can read how to activate CloudFlare in the following post: [https://zemi.mk/blog/kako-da-aktiviram-cloudflare/](https://zemi.mk/blog/kako-da-aktiviram-cloudflare/)

Activate Gzip Compression. You can do this through the Optimize Website tool in cPanel or by adding the following rules to your .htaccess file:

<IfModule mod_deflate.c>
# Compress HTML, CSS, JavaScript, Text, XML and fonts
AddOutputFilterByType DEFLATE application/javascript
AddOutputFilterByType DEFLATE application/rss+xml
AddOutputFilterByType DEFLATE application/vnd.ms-fontobject
AddOutputFilterByType DEFLATE application/x-font
AddOutputFilterByType DEFLATE application/x-font-opentype
AddOutputFilterByType DEFLATE application/x-font-otf
AddOutputFilterByType DEFLATE application/x-font-truetype
AddOutputFilterByType DEFLATE application/x-font-ttf
AddOutputFilterByType DEFLATE application/x-javascript
AddOutputFilterByType DEFLATE application/xhtml+xml
AddOutputFilterByType DEFLATE application/xml
AddOutputFilterByType DEFLATE font/opentype
AddOutputFilterByType DEFLATE font/otf
AddOutputFilterByType DEFLATE font/ttf
AddOutputFilterByType DEFLATE image/svg+xml
AddOutputFilterByType DEFLATE image/x-icon
AddOutputFilterByType DEFLATE text/css
AddOutputFilterByType DEFLATE text/html
AddOutputFilterByType DEFLATE text/javascript
AddOutputFilterByType DEFLATE text/plain
AddOutputFilterByType DEFLATE text/xml

# Remove browser bugs (only needed for really old browsers)

BrowserMatch ^Mozilla/4 gzip-only-text/html
BrowserMatch ^Mozilla/4.0[678] no-gzip
BrowserMatch \bMSIE !no-gzip !gzip-only-text/html
Header append Vary User-Agent
<ifModule mod_gzip.c>
mod_gzip_on Yes
mod_gzip_dechunk Yes
mod_gzip_item_include file \.(html?|txt|css|js|php|pl)$
mod_gzip_item_include mime ^application/x-javascript.*
mod_gzip_item_include mime ^text/.*
mod_gzip_item_exclude rspheader ^Content-Encoding:.*gzip.*
mod_gzip_item_exclude mime ^image/.*
mod_gzip_item_include handler ^cgi-script$
</ifModule>


Optimize the images on your website. For this, you can use a plugin such as Smush – Optimize, Compress and Lazy Load Images.

Optimize the WordPress database with the WP-Optimize plugin.

Minify JS and CSS files by using the Autoptimize plugin.

To check your website’s performance during the optimization process, you can use services such as:

[https://gtmetrix.com](https://gtmetrix.com) [https://developers.google.com/speed/pagespeed/insights/](https://developers.google.com/speed/pagespeed/insights/) [https://tools.pingdom.com](https://tools.pingdom.com)

Source:

Use your discount coupon from our WordCamp Skopje flyer within the next 30 days and get a 90% discount on the new “Tauren WCSK Pro” package, featuring increased LVE limits compared to the standard “Tauren Pro” package.

Each user may use the coupon only once. Any order for a second package using the same coupon will be refunded, and the package will be suspended.

The coupon is intended only for new users. Domains that have already been hosted within the Zemi.mk network cannot be hosted on the “WCSK Pro” package. If it is determined that domains previously hosted on Zemi.mk are being hosted on a newly purchased “WCSK Pro” package, the package will be suspended and the funds refunded.

Zemi.mk reserves the right to disable the coupon if misuse is detected.

We are giving away three tickets for this year’s WordCamp Skopje 2023. To participate in the draw, fill out the form no later than 23:59 on October 11. The winners will be selected at random.
Applications submitted after the designated period has expired will not be considered. Incorrect or incomplete information will also be considered invalid.

Zemi.mk supported the .mk WordPress community and the organization of WordCamp Skopje 2023 this year with a Gold Sponsorship.

We are pleased to announce our special price for .mk domain registration. From now on, registration of your desired .mk domains through Zemi.mk will be available at half price — for only 399 denars!

After the first year, domains are renewed at the regular price of 649 denars, or the current renewal price for .mk domains.

To register your .mk domain, visit the following link, search for it, and follow the few easy steps to complete the registration.

Meet VIKI, an Artificial Intelligence for Creating Names integrated into the Zemi.mk platform, which generates new domain ideas based on your search. VIKI uses artificial intelligence to help our customers find the perfect domain for their business.

VIKI is powered by OpenAI and uses advanced algorithms and NLP to suggest domains that are relevant, easy to remember, and available for registration.

With VIKI, you can get fresh and unique domain ideas that you may not have considered before. In addition, it suggests alternative domain extensions and checks domain availability in real time, saving you time and effort.

We hope that VIKI will simplify the way our customers search for domains, making the process faster, easier, and more efficient.

VIKI is available through the domain search page: [https://zemi.mk/search.aspx](https://zemi.mk/search.aspx)