
Zemk.mk – Блог

This tutorial will help you install and activate a WordPress theme. A theme can be installed in two ways: by choosing one from the theme catalog within WordPress, or by uploading a theme you have purchased from a third party. For paid premium themes, we recommend browsing ThemeForest or TemplateMonster.

First, we will explain the process of installing a theme from the WordPress theme catalog.

Step 1

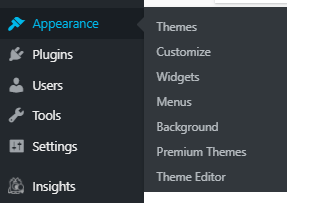
After successfully logging in to the WordPress admin area, from the menu on the left side, select Appearance -> Themes, or if your WordPress is in Macedonian, Изглед -> Теми.

wordpress-tema-chekor-1

Step 2

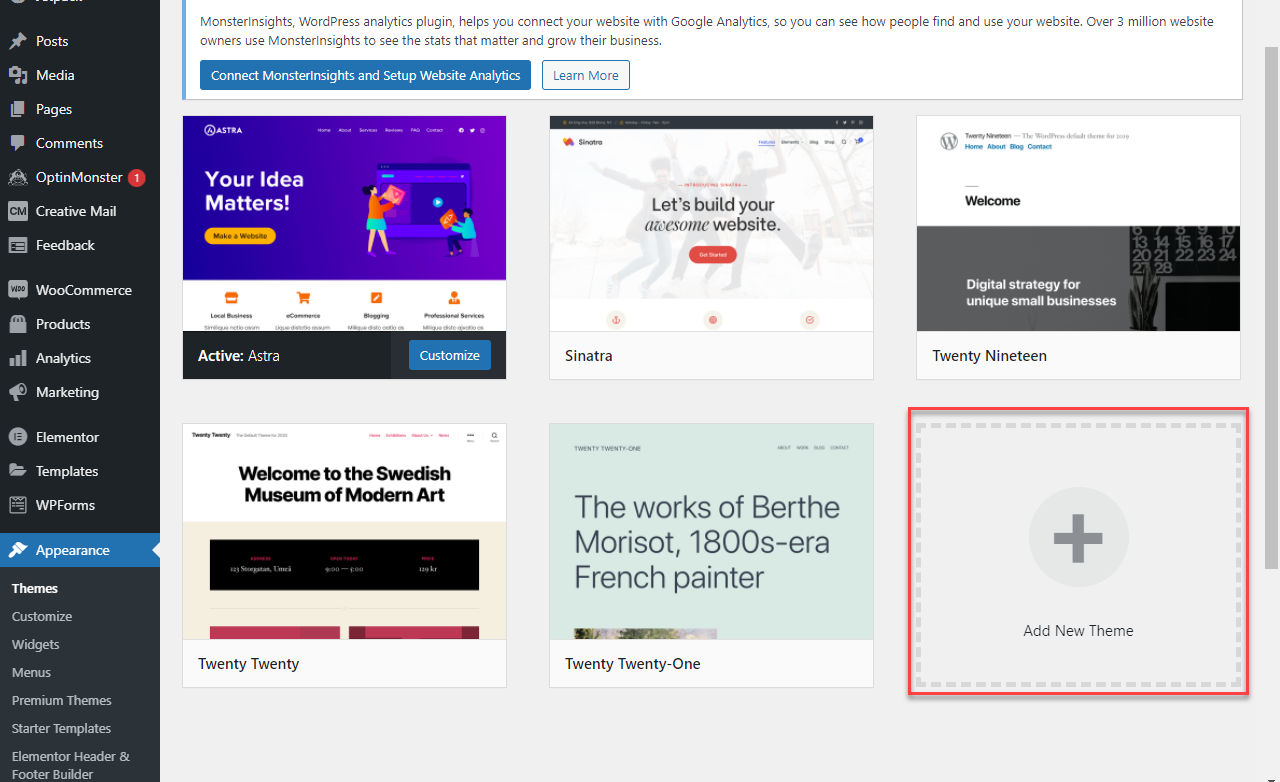
This will take you to the “Appearance” section of WordPress, where the themes currently installed on your WordPress website are listed. To add a new theme, select “Add New”. This button is usually at the bottom.

wordpress-tema-dodadi-tema-chekor-2


Step 3

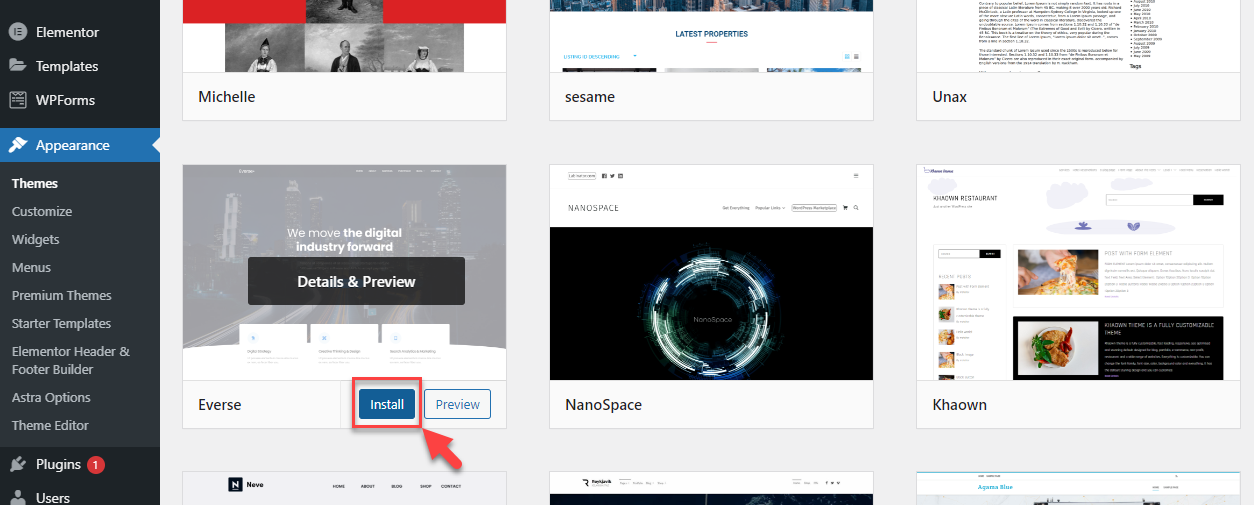
Here, you can search for a theme by using the advanced “Feature Filter”, then select “Apply Filters”. The themes will then be listed according to the characteristics you selected in the filter. Once you choose a theme you like, click “Install”.

wordpress-tema-dodadi-tema-chekor-4


Step 4

Theme installation may take some time, depending on the size of the theme. After the theme is installed, you need to activate it by clicking the “Activate” button.

wordpress-tema-dodadi-tema-chekor-5

The theme is now active and you can continue using it.


What should you do if you have already purchased a theme and want to upload and activate it on your WordPress website?

If you have already purchased a theme and have it on your local computer, you need to upload and activate it. The first two steps are the same as above, so we will not repeat them.

Step 3

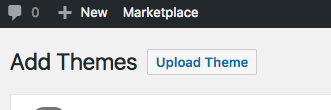
At this step, you need to upload the theme from your local computer. The theme must be in a compressed file format (.zip). To do this, click the “Upload Theme” button, select the .zip file of the theme, and upload it.

wordpress-upload-tema-dodadi-tema-chekor-1

During the theme upload process, make sure to keep your browser window open; otherwise, the upload may not complete successfully. Once the theme is fully uploaded, activate it in the same way as described in Step 4 above.

Note:

During the theme upload process, an error can often occur because the maximum upload limit has been exceeded (Upload Max Filesize). To increase the maximum allowed file upload limit, read the guide at the following link.


If you are wondering how to create a website yourself, but you have no technical knowledge, do not know any programming languages, and do not know how to design websites, we have good news for you. Watch our latest video tutorial on how to create a website by yourself, without a budget, using free tools and the tools available with the hosting packages from Zemi.mk.

In this tutorial, we used WordPress, the free drag-and-drop website builder Elementor, and the free WordPress theme Astra.

Creating a website with the trio of WordPress, Elementor, and Astra is truly simple and intuitive. All you need is a little imagination and willingness. Who knows, maybe the next Macedonian web designer of the year is hiding inside you. Make yourself a double espresso and let’s begin!


To create a website with Elementor, you first need to have WordPress installed on your domain. You can read how to install WordPress here.

WordPress is the most widely used CMS platform, allowing you to easily create and manage websites for free. Perhaps the biggest advantages of WordPress compared to competing platforms are its simple and intuitive user interface, which is also available in Macedonian, as well as the large number of free and premium templates/themes and add-ons/plugins. With these, you can personalize your website down to the smallest detail so that it meets all your requirements, both aesthetically and functionally.

Zemi.mk offers one-click WordPress installation through the Softaculous auto-installer. Softaculous is available as a tool in cPanel and, in addition to WordPress, offers installation of many free and premium scripts and web applications. Automatic WordPress installation is available on the basic hosting packages from Zemi.mk, which also use LiteSpeed Web Server, created for maximum optimization of dynamic websites such as those built with WordPress.

To install WordPress, first log in to cPanel using the hosting management details sent to your email after the service has been paid for and activated. The cPanel login link is usually ime-na-vashiot-domen.mk/cpanel.

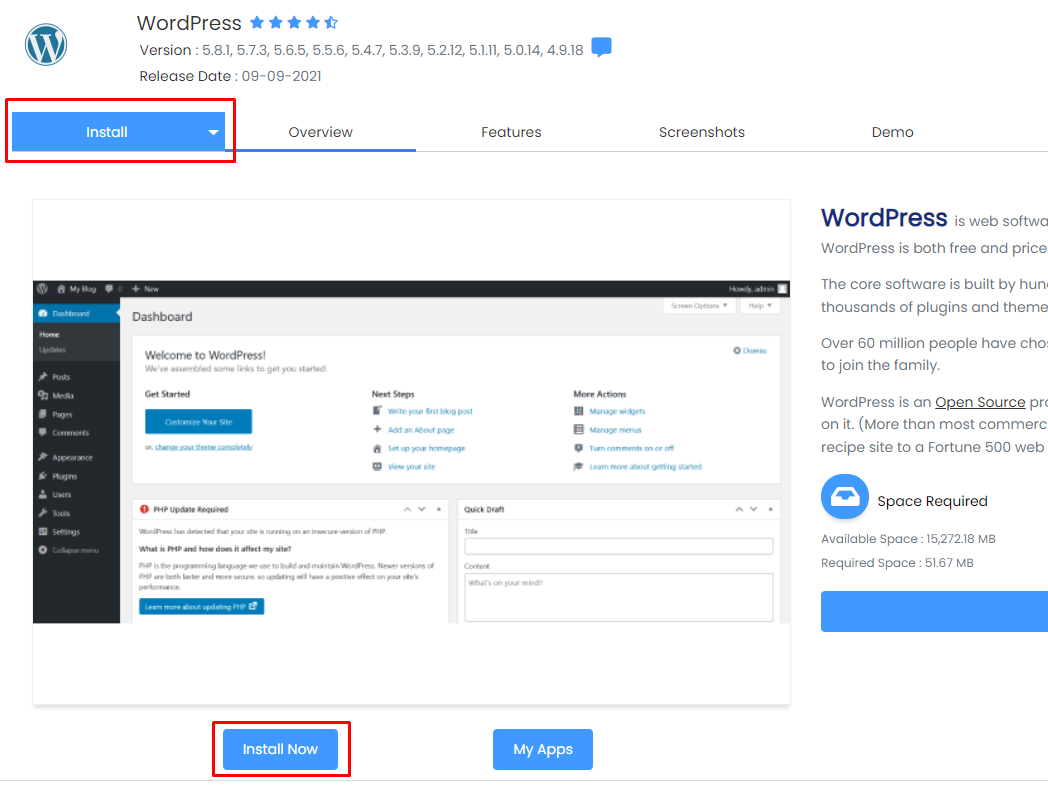
After logging in, click the WordPress icon shown in the image below.

softaculous-instalacija-na-wordpress-cpanel

From here, you will be redirected to the WordPress installation page, where you need to click the “Install” or “Install Now” button.

instalacija-na-wordpress

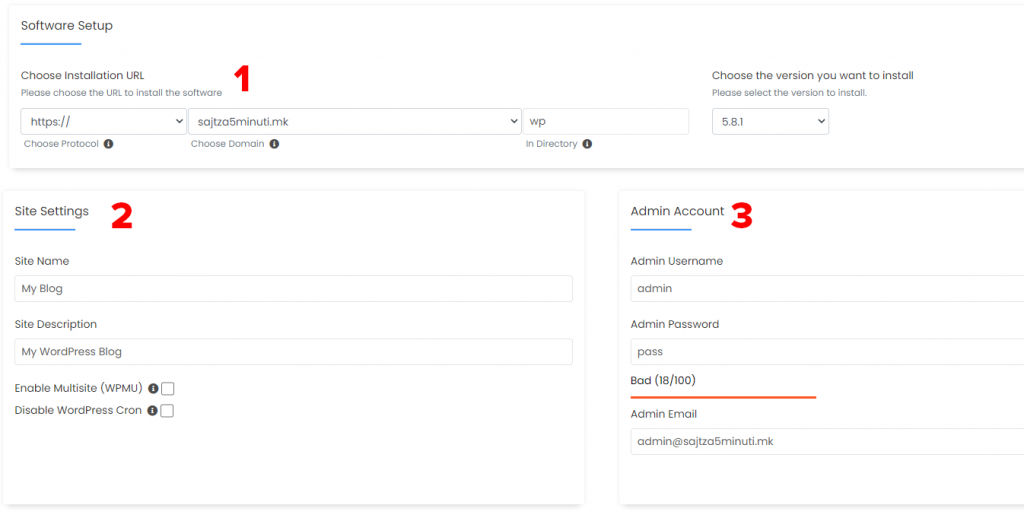
You will then see the page with the settings for your WordPress installation.

  • Software Setup (1 in the image)
    • Here, you need to set the URL for your website or WordPress installation. By default, Softaculous installs WordPress in the /wp folder as a precaution to avoid overwriting an existing WordPress installation on the main domain. If you are installing WordPress on your domain for the first time, you most likely want to install it in the root folder of the domain, so visitors can access it by entering only your domain, without the /wp extension. If you leave the “In Directory” field filled in with wp, your WordPress website will be available at ime-na-vashiot-domen.mk/wp, but not at ime-na-vashiot-domen.mk. To install WordPress on the main domain, delete wp from the “In Directory” field and leave it empty.
    • The version selection field is always set to the latest version available through Softaculous, which is the recommended version for installation. This field should usually remain unchanged.
  • Site settings (2 in the image)
    • Site name — enter the name of your website here.
    • Site description — enter the description of your website here. The name and description can easily be changed after installation through the WordPress admin panel.
    • Enable Multisite — whether to enable multiple WordPress websites managed through a single admin panel. This usually remains unchanged and disabled.
    • Disable WordPress cron — whether to disable the WordPress Cron system. This is also recommended to remain unchanged and disabled.
  • Admin Account (3 in the image) — these are the details you will use to log in to the admin panel in the future, so you can manage your WordPress website. These details are important and should be remembered or written down.
    • Admin Username — for better security, it is recommended to change this field and replace “admin” with another username of your choice. Only Latin characters are allowed.
    • Admin Password — this is the password for the administrator account and should be complex enough to provide a higher level of security.
    • Admin Email — the administrator’s email address.

setiranje-na-wordpress-instalacija

  • Choose Language (4 in the image) — language selection. Macedonian is not listed here, but it is available for selection later through the admin panel.
  • Select Plugin(s) (5 in the image) — selection of plugins that will be initially installed on your WordPress website. It is recommended to select Limit Login Attempts (Loginizer), which provides protection against brute-force hacking attacks.

setiranje-na-wordpress-instalacija-2

  • Advanced options — leave this section unchanged unless you are an experienced user.
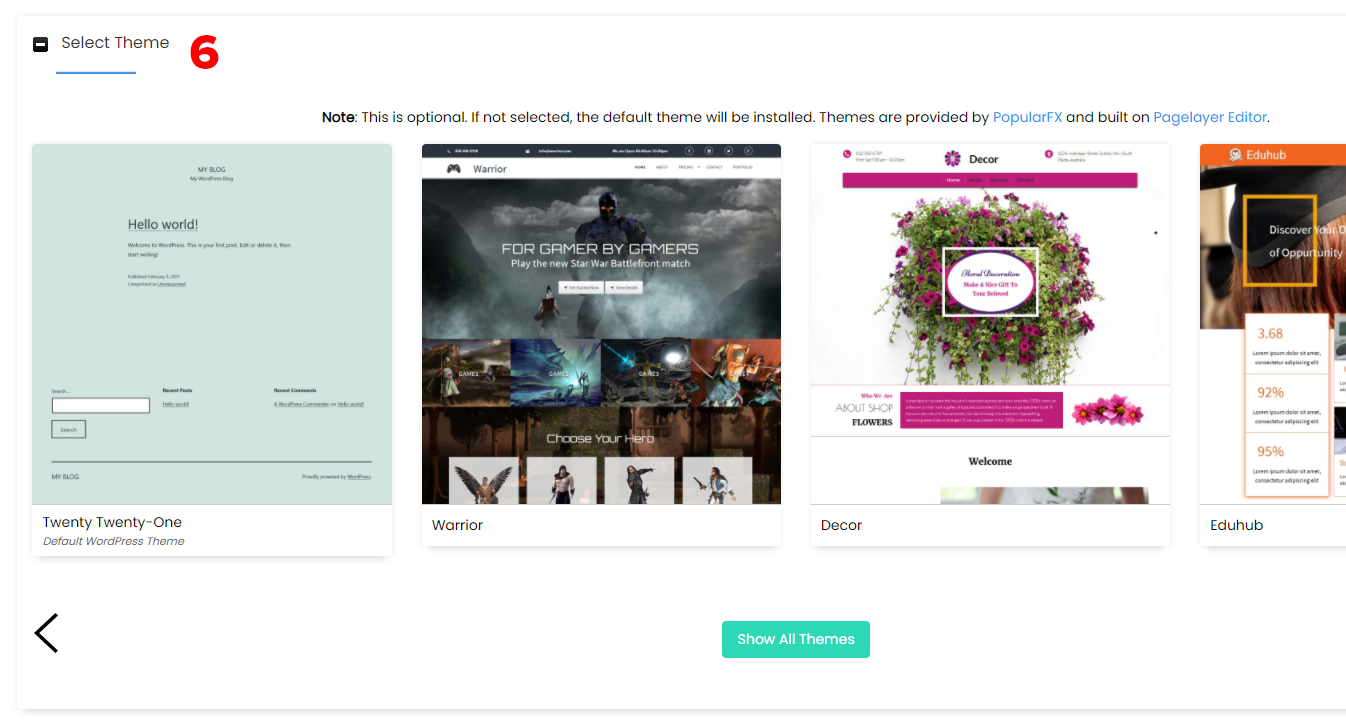
  • Select Theme (6 in the image) — here you can choose a theme/design for your WordPress website from the options offered by Softaculous. You can also leave it unchanged if you have already chosen another theme or want to use the default WordPress theme. In the future, you can install and manage themes through the admin panel.
  • Click “Install”

setiranje-na-wordpress-instalacija-3

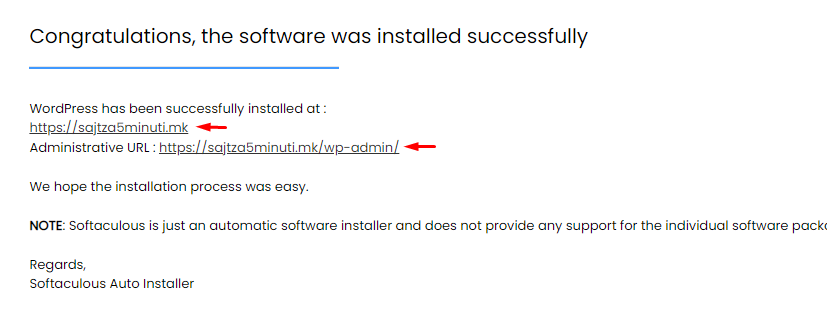
After WordPress has been successfully installed, a page will open showing the two most important links for a WordPress website: the website link and the admin panel login link.

linkovi-za-wordpress-instalacija

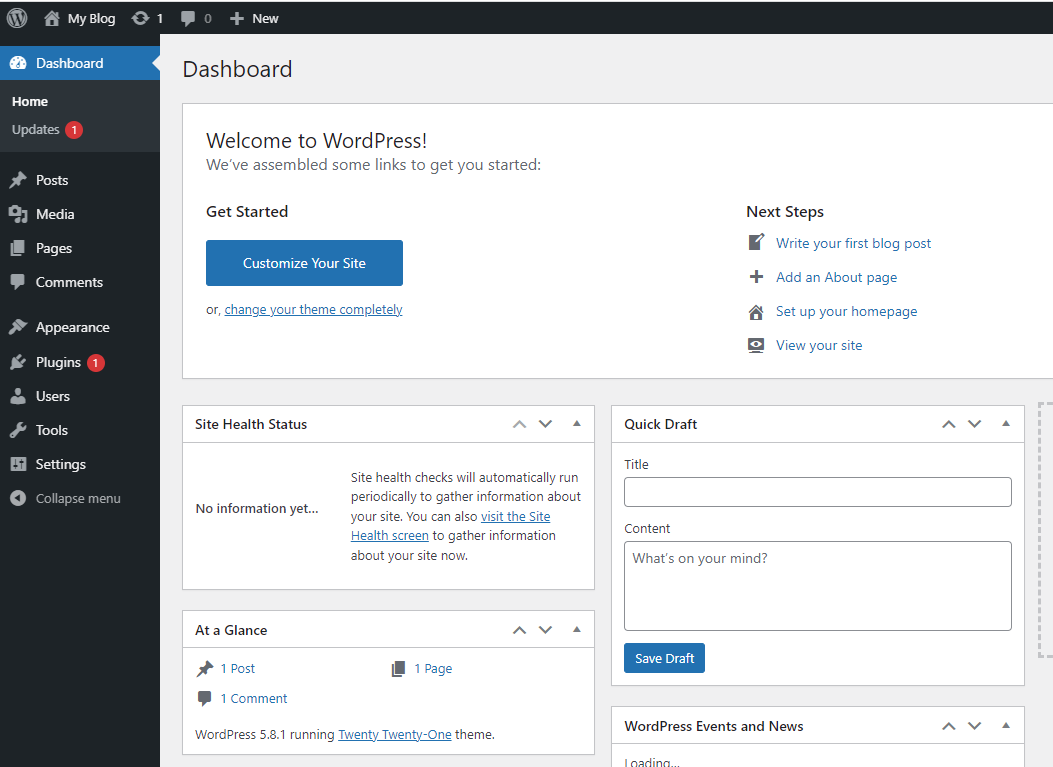
If you click the admin panel login link or “Administrative URL”, you will be redirected to it without needing to log in with the admin panel details you entered earlier. This only happens this time. In the future, when accessing the admin panel link, you will need to enter your username and password.

wordpress-dashboard

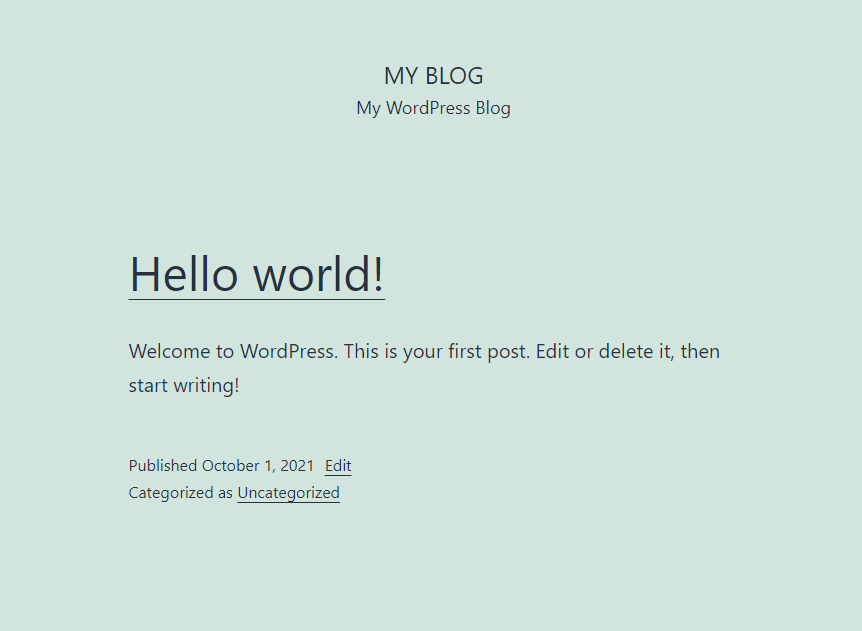
By clicking the main website link, you will be redirected to the homepage of your WordPress website.

wordpress-homepage

You can view the basic hosting packages from Zemi.mk at the following link.

Recently, through the Zemi.mk service, you can also create email addresses without needing to log in to cPanel or the corresponding web panel.

All you need to do is log in and go to the control panel.

From there, if you want to create the free email address you received with your .mk domain registration during the “summer promotion”, click the “gear” icon next to the desired domain.

The domain management page will then open. Part of this page is the email address creation component. Enter how you want your email address to appear in the empty field; the domain is automatically selected for you, then click “Create”.

Your email address is now created. Copy the password that has been automatically generated for you and click the “Log in” link on the far right of the same row. You will then be redirected to the page where you can log in to your new email address.

When you log in for the first time, a new page will open where you can access your mailbox, change your password by clicking “Password & Security”, or click “Automatically configure my device” to view the settings for connecting your email address to a desktop or mobile email client such as Outlook, Gmail, Apple Mail, and others.

At the request of our users, we have added the option to assign a “manager” contact to each domain, both .mk and generic domains. This contact must be a Zemi.mk member and, after being granted the appropriate privileges, will be able to manage the domain from their own account.

This feature will make domain management easier for web designers and web design companies working with both their own domains and their clients’ domains. Now, all domains can be made available for management through their own Zemi.mk account, eliminating the previous need to log in to separate accounts in order to make changes to domains with different registrants.

To add a domain management contact, log in to the Control Panel, click “Details” for the desired domain, and immediately below the three main contacts you will find the field for adding the new manager contact. All you need to do is enter the email address used by the user you want to grant management privileges to when they registered on Zemi.mk.


In addition to the standard offer of .mk domains, Zemi.mk has also become a registrar for generic international domains.

You can view the pricing and the full list of all available domains for registration at the following link.

Among the most popular options, we highlight .com, .net, .org, and .co, which you can register for only 899 denars for a full year.

WordPress is a free, open-source content management system (CMS) based on PHP and MySQL. As the most popular platform for building websites, it is subject to a large number of attacks by hackers who try to use your server resources for their own purposes. Most compromised WordPress websites are used for sending spam messages or hosting phishing content, which can lead to servers being blacklisted globally.

Outdated versions of WordPress are increasingly compromised because of known vulnerabilities and bugs. WordPress updates are essential for the security and stability of your website. You should make sure that the WordPress core, plugins, and theme you use are regularly updated and are not pirated. The most common cause of virus-related problems on WordPress is the use of cracked/nulled themes and plugins.

The first step in protecting WordPress is to update it to the latest released version, regularly change login passwords, and delete plugins and themes that you do not use.

To avoid hacking, email abuse, spam, and viruses, follow these rules:

  • Update your WordPress CMS version, themes, and plugins to the latest version in order to protect your websites from known vulnerabilities.
  • Set a strong password for website administrator access and email accounts, and change your password regularly.
  • Do not keep unnecessary files on your hosting account.
  • Avoid having directories or files with 0777 permissions.
  • Scan your local computer with a good antivirus program.
  • In case of viruses, immediately change your email password.
  • Do not save your password in any email client or browser.
  • Scan your local machine, especially the system configured for email, for any malware or viruses.
  • Keep your operating system and antivirus software updated to the latest versions.
  • Change the passwords for cPanel, FTP, email accounts, and similar services.
  • Use FTP only when needed, and then delete the created FTP access accounts.

If your website is hacked, it is recommended that it be completely removed and recreated from scratch using the latest version of WordPress, a valid theme, and valid plugins.

If you do not know whether a specific plugin is good or not, read its reviews or search for comments about it through google.com.

If the server detects the presence of a virus, hacking activity, or spam sending, it may automatically suspend the compromised hosting account as a preventive measure against further unwanted activity.

If your hosting account has been suspended because of a virus, you need to contact us at [[email protected]](mailto:[email protected]) for reactivation.

Email is not only one of the oldest methods of online communication; it remains one of the most in-demand channels for electronic communication today and continues to evolve. Email is a popular way to promote your business and the easiest way for your clients and partners to connect with you, or simply to exchange information.

Hosting services from Zemi.mk allow you to create email addresses with your own domain. For example, if your domain is mojotubavsajt.mk, you can create an email address such as [[email protected]](mailto:[email protected]).

What are the benefits of an email address with your own domain?

  1. With this type of email address, your clients can find you more easily and contact you at any time.
  2. You will have access to your email from anywhere, at any time, and from any device.
  3. In addition to accessing your email through a browser, you can also access it through an email client on a desktop computer or smartphone.
  4. An email address with your own domain adds credibility and trust among your clients, partners, and everyone you communicate with by email.
  5. Your email address will be recognizable and easy to remember.
  6. You will have full control over your email service.
  7. You can create an unlimited number of email addresses that include the name of your website or company.

How to create an email address with your own domain?

First, log in to the control panel using the login details sent to you in the welcome email. The login link is vasiotdomen.mk/cpanel.

After logging in, from the list of cPanel tools, select “Email Accounts”.

1

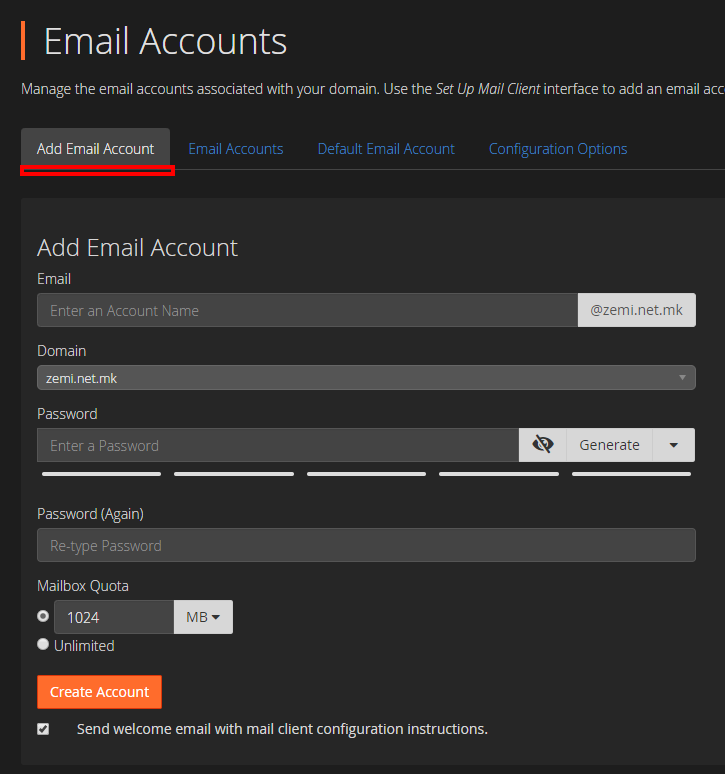
Then click the “Add Email Account” tab and fill in the fields to create a new email address with your domain. “Mailbox Quota” allows you to limit the size of the mailbox. Enter the amount of storage space you want to assign to this email address, or select “Unlimited” for an unlimited mailbox size.

ef0edd39f0e51b89c238e0b1a6500b7f


How to check your email through a browser?

If your domain is mojdomen.mk, go to mojdomen.mk/webmail, enter your email address and the password you set during creation, and access your mailbox.


How to set up your email address in an email client such as Microsoft Outlook, other desktop clients, or smartphone email apps?

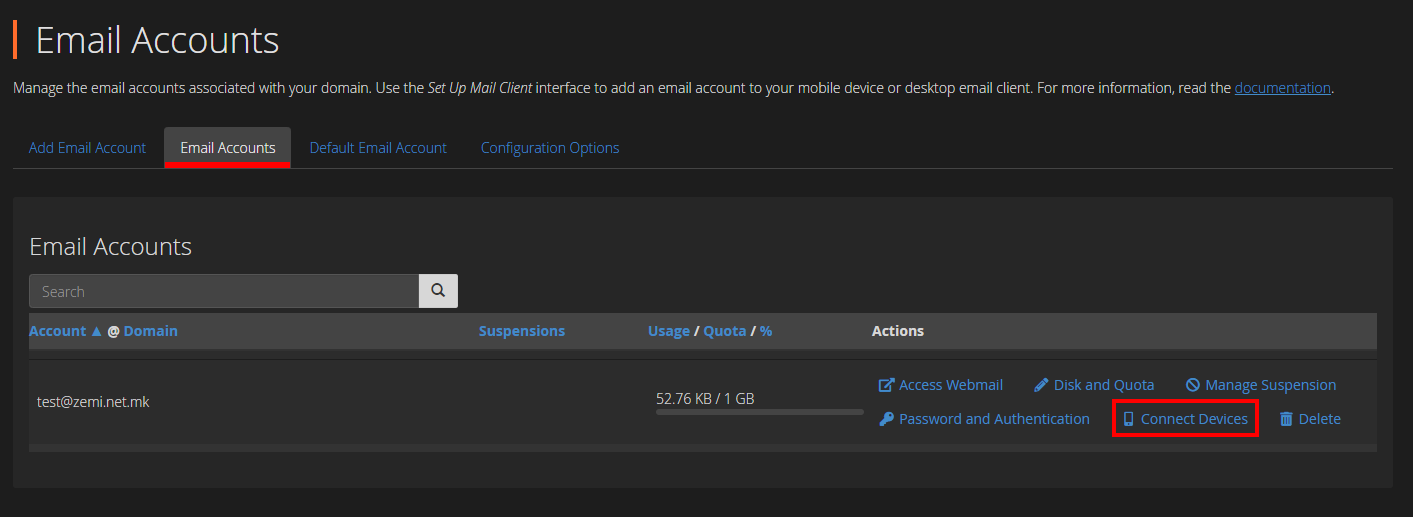
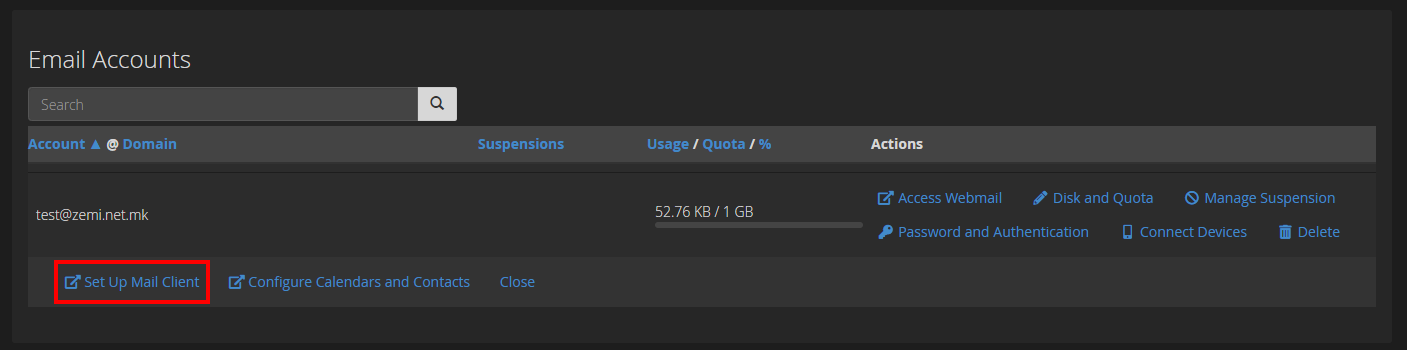
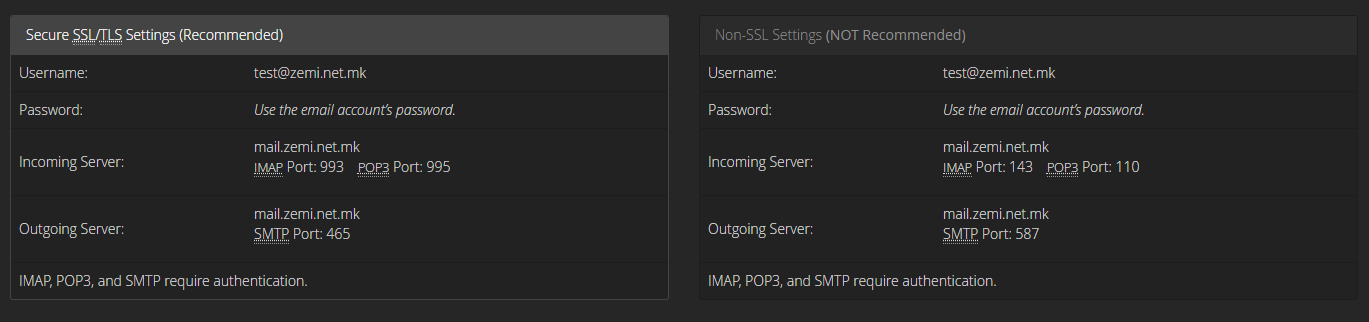
To set up your email address in an email client, you need the Incoming and Outgoing mail servers. To view them, go to the “Mail Accounts” tool in cPanel. From there, for the desired email address, click “Connect Devices”, then click “Set Up Mail Client”.

67de5b20f1171183d690afacaf53be73

b89f1e654f15f3d32ad3acd2e930460c

Here you can view your IMAP Incoming servers, as well as your SMTP Outgoing servers. Our recommendation is to always use the IMAP protocol.

a48512054688cc1cb8cca175e6a84f30

The authorized .mk domain registrar and web hosting provider, Zemi.mk, upgraded its platform a few days ago. In addition to the standard functionalities required for its operations, Zemi.mk has introduced a new partner program.

The partner program is divided into three tools.

  1. Domain Market.

The Domain Market is an opportunity for all webmasters and domain traders to list their domains for sale at a standard or premium price. If someone searches for your domain that has been listed for sale, they will be shown the price you entered, with the option to contact you regarding the purchase of the domain.


  1. Partner Program / Affiliate Program.

If you have a larger number of domains that are sitting unused but still receive visitors, or if you run a portal and need a new earning channel, you can enable the partner program for your domain and place a Zemi.mk advertising banner, or simply redirect visitors to the unique link that will be generated when you activate the program. If one of the referrals from your link purchases a service from Zemi.mk, you will receive monetary compensation.


  1. Freelancer.

Zemi.mk Freelancer is now available for all freelancers. Create your own portfolio and offer your services to a highly targeted group: users of Zemi.mk services. Profiles are listed on the Zemi.mk homepage as well as during domain searches. If someone needs the services you offer, they can contact you by message.

Recently, the Zemi.mk mobile application also became available to all Android smartphone users. The app offers users the simplest way to renew services on the go with online payment, change nameservers, and update details for .mk domains. As an additional feature, the app allows you to enable the “UP-Time” robot for each domain and receive notifications if your website becomes unavailable, along with other options. The iOS version of the application is expected to be released soon.

In addition to these updates, Zemi.mk has also received a new modern design.

All of these changes are aimed at creating a Macedonian “one-stop” platform for webmasters. Alongside the recent upgrades, the Zemi.mk team has also announced additional improvements that are expected to be released gradually in the coming period.

It is our great pleasure to present the Android application for managing your Zemi.mk services :).


screenshot_2016-11-22-13-27-40 screenshot_2016-11-22-13-27-51


If your .mk domains are already on the right platform, Zemi.mk, and you own an Android phone, we warmly recommend installing the application. By logging in with your Zemi.mk username and password, you can receive notifications on your smartphone at any time about the expiry of your domain or web hosting package.

In addition to expiry notifications for Zemi.mk services, we have also created the “Up-time Robot”, designed to check whether your website is publicly available or requires your attention. With the Up-time Robot, your websites are automatically checked every 5 minutes to confirm whether they are accessible. You can enable or disable it separately for each domain.

We have also enabled service renewals through the application with online payment, as well as changes to domain details such as technical or administrative contacts and nameservers.


screenshot_2016-11-22-13-28-52 splash


Through the application, you can also search for .mk domains with a detailed WHOIS report.

You can download it from the following link, or search for it on Google Play using the keyword “Zemi.mk”.

The application was developed by Vortechs Media DOO, Valandovo.
Development: Aleksandar Manev
Design: Stole Kitanovikj
Web Service: Kostadin Stojchev